Anchorlube, cutting fluid, 4 oz.
Original price was: $12.95.$11.99Current price is: $11.99.Anchorlube, 4 oz. bottle. Anchorlube offers an outstanding level of tool-life along with a fast, smooth cut on the hardest metals – even with exotic metals.

Showing all 12 results

Anchorlube, 4 oz. bottle. Anchorlube offers an outstanding level of tool-life along with a fast, smooth cut on the hardest metals – even with exotic metals.

Anchorlube, 8 oz. bottle. Anchorlube offers an outstanding level of tool-life along with a fast, smooth cut on the hardest metals – even with exotic metals.

Shotgun Choke and Forcing Cone Hone *Extra Hone stones, 240 grit.
Shotgun Choke and Forcing Cone Hone *Extra Hone stones, 240 grit. Can also be used on chokes.

These simple tools allow you to keep the barreled action properly aligned in the stock during the inletting process. Without them it is very difficult to get a tight inlet. 98 Mauser Springfield 03, 03-A3 and Krag actions Remington 700, 721, 722 Savage 110 Winchester 70 Sako

These simple tools allow you to keep the barreled action properly aligned in the stock during the inletting process. Without them it is very difficult to get a tight inlet. 98 Mauser Springfield 03, 03-A3 and Krag actions Enfield 1914, 1917 and SMLE CZ 550 or 7.7 Jap Arisaka Remington 700, 721, 722 Winchester 70…

These simple tools allow you to keep the barreled action properly aligned in the stock during final fitting. Recommended by stockmakers, these Forster Stockmakers Hand Screws are used in the final accurate fitting of the stock to the action. These screws are precision made and hardened to make repeated trial fittings. Set of two. To…

Removes striker assembly in seconds for fast disassembly of all Remington bolts. Works with spring relaxed or cocked. Hook fits into the notch of the firing pin head. Rotating the lever pulls firing pin head back and locks it. Fast and easy.

A matte contrasting transfer material for inletting any part into a stock. Simply apply a thin coat to the part that you wish to inlet.Seat into stock recess tap with rawhide or similar mallet. Remove part and scrape away contact area you wish to remove from the stock. Used like other inletting marking systems to…
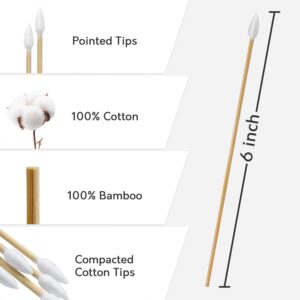
Long cotton swabs for firearm and precision tool cleaning. The low-lint cotton tip and 6″ flexible shaft reach into chambers, bolt faces, raceways, and other tight areas without leaving debris. Well suited for cleaning reamer flutes and cutting edges. The bamboo shaft is stronger than wooden swabs and less likely to snap when pressure is…

Seems like a lot of money… Why should I do this? For a short description click here. Rental Protection Plan (RPP) units as described below, once purchased, remain in effect for all future orders until protection plan units are utilized for damages on an invoice. So this plan clearly benefits repeat customers the most. Rental…

Tap Magic, 4 oz. can enough cutting fluid to do many jobs. Works as a chamber reaming cutting fluid.
No products in the cart.
|
Uploaded
Failed
|
 |